Text detection with mobile camera using React Native and AWS Rekognition
18 June, 2018
I’ve been wanting to play around with text detection using react native. So I think this is a fun little project to start with. In this post we’ll go through creating the app in the video above.
We’ll be using the following services and libs:
- Create React Native App https://github.com/react-community/create-react-native-app
- AWS amplify https://github.com/aws/aws-amplify
- AWS Rekognition https://aws.amazon.com/rekognition
All code in this post can be found here https://github.com/glenbray/text-reader
This will be split up into 3 different sections
- Configuration
- UI
- Text detection with camera and AWS Rekognition
Configuration
First thing we’ll do is setup our environment and create the react native project.
First we’ll install create react native app.
$ npm i -g create-react-native-appThen create a new react native project called text-reader
$ create-react-native-app text-reader && cd text-readerInstall AWS Amplify in the react native project
$ yarn add aws-amplify aws-amplify-react-nativeInstall AWS mobile CLI
$ npm i -g awsmobile-cliYou’ll need to configure the CLI to use your AWS credentials
$ awsmobile configureLets create a src directory where we’ll store some code later
$ mkdir srcNow setup the backend
$ aws mobile init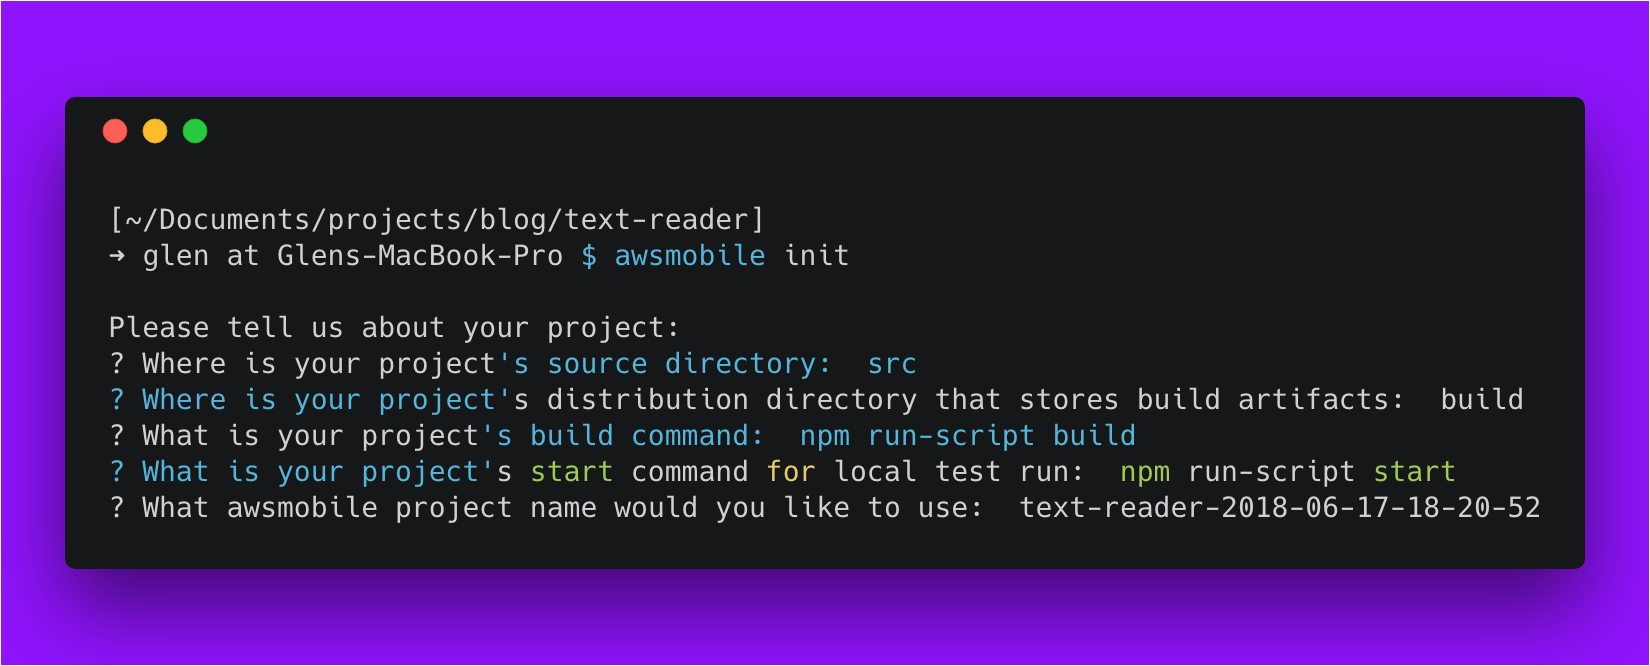
You’ll notice that will also generate a file within the src directory which will contain your configuration for your backend.
Enable the cloud api
$ awsmobile cloud-api enable && awsmobile pushFinally, we’ll set the appropriate permissions for AWS Rekognition.
From the AWS console, navigate to IAM then select roles. Select the role name that was automatically created.
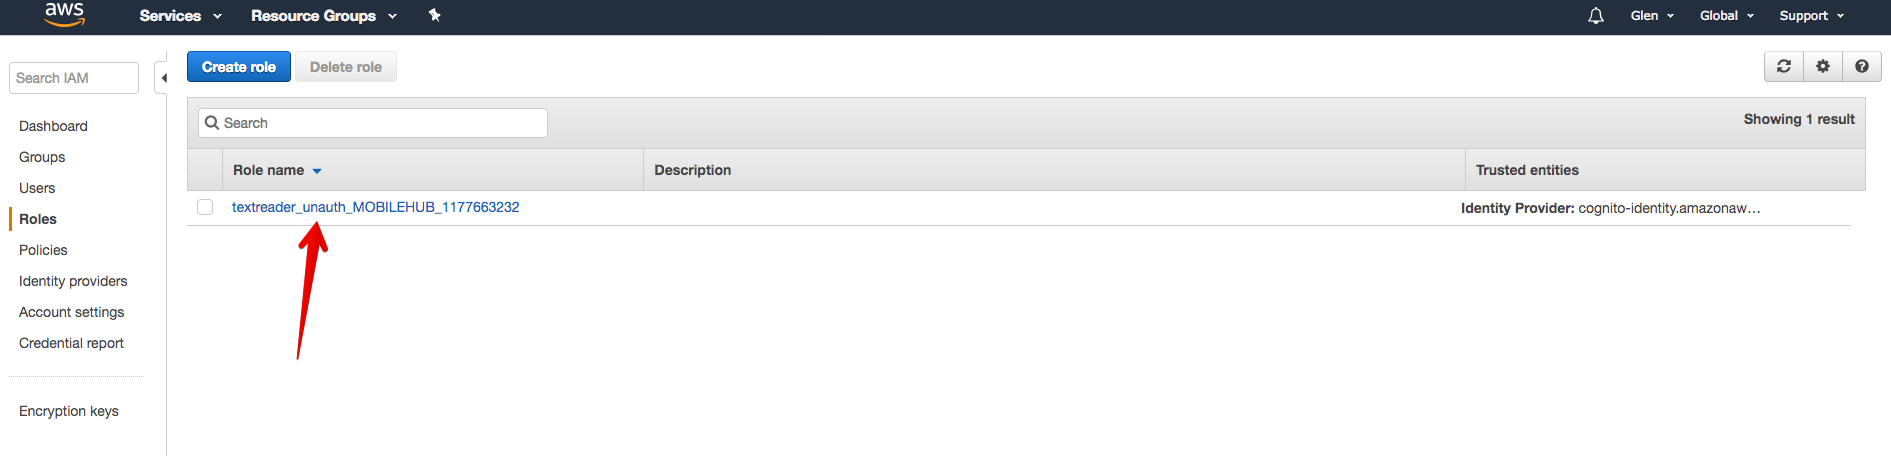
In the permissions tab, press Attach Policy. In the search box, search for rekognition. We won’t worry about setting specific policies so we’ll just grant full access by using the AmazonRekognitionFullAccess role. Select that role then click Attach Policy.
Now that we have done the configuration we can move on with setting up the UI.
User Interface
What we’ll do in this section is get the app up and running without any functionality and some fake data to start off with.
Lets start with installing react native elements.
yarn add react-native-elementsLets get started creating our components
We’ll create 3 components and save them in the /src directory.
The ConfidenceBadge component is a badge component we’ll use to display the confidence percentage of the text detection.
Both the ErrorMessage and the Loader components will be used to display an error message and loader respectively.
| import React from "react"; | |
| import { Badge } from "react-native-elements"; | |
| const ConfidenceBadge = ({ confidence }) => { | |
| let color = "green"; | |
| if (confidence < 80) color = "orange"; | |
| if (confidence < 60) color = "red"; | |
| return ( | |
| <Badge | |
| value={`${confidence}%`} | |
| containerStyle={{ backgroundColor: color }} | |
| /> | |
| ); | |
| }; | |
| export default ConfidenceBadge; |
| import React from "react"; | |
| import { StyleSheet, Text, View } from "react-native"; | |
| const ErrorMessage = ({ message }) => ( | |
| <View style={styles.errorContainer}> | |
| <Text style={styles.errorText}>{message}</Text> | |
| </View> | |
| ); | |
| const styles = StyleSheet.create({ | |
| errorContainer: { | |
| flex: 1, | |
| alignItems: "center", | |
| justifyContent: "center" | |
| }, | |
| errorText: { | |
| color: "red" | |
| } | |
| }); | |
| export default ErrorMessage; |
| import React from "react"; | |
| import { ActivityIndicator } from "react-native"; | |
| const Loader = () => { | |
| return <ActivityIndicator size="large" color="#9013FE" />; | |
| }; | |
| export default Loader; |
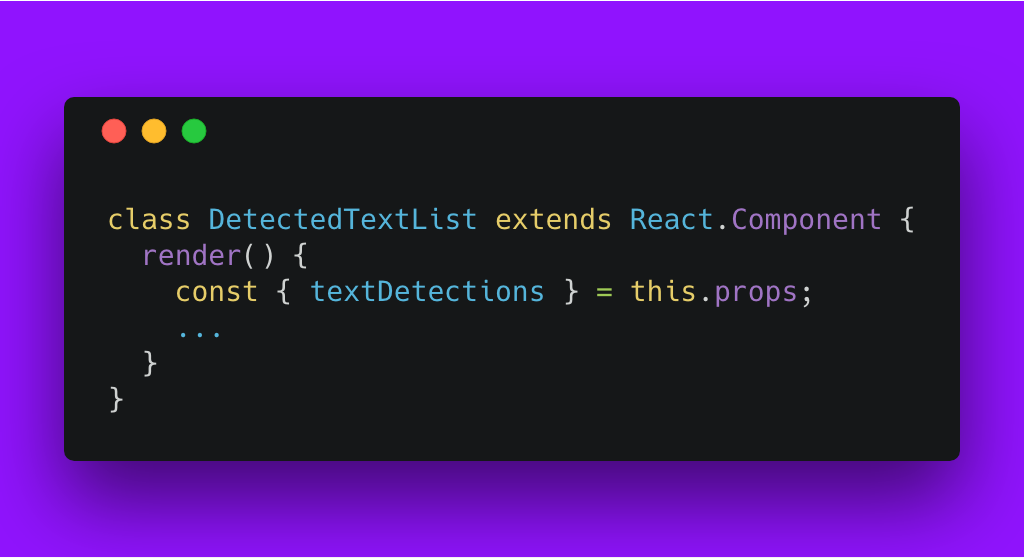
We’ll now create a component that we’ll use to render our text detections. You’ll notice that there is an array of fake text detections which we will replace soon.
src/DetectedTextList.js| import React from "react"; | |
| import { StyleSheet, Text, View, TouchableOpacity } from "react-native"; | |
| import { Icon } from "react-native-elements"; | |
| import { Camera } from "expo"; | |
| import Loader from "./Loader"; | |
| class TextDetectingCamera extends React.Component { | |
| state = { loading: false }; | |
| constructor(props) { | |
| super(props); | |
| this.camera = React.createRef(); | |
| } | |
| takePicture = async () => { | |
| const options = { quality: 0.5, base64: true }; | |
| const photo = await this.camera.current.takePictureAsync(options); | |
| this.setState({ loading: true }, async () => { | |
| try { | |
| this.props.close({ textDetections: [] }); | |
| } catch (err) { | |
| console.log("error", err); | |
| alert("An error has occured"); | |
| this.props.close({ textDetections: [] }); | |
| } | |
| }); | |
| }; | |
| render() { | |
| if (this.state.loading) { | |
| return ( | |
| <View style={styles.loadingContainer}> | |
| <Loader /> | |
| </View> | |
| ); | |
| } | |
| return ( | |
| <Camera | |
| ref={this.camera} | |
| style={styles.container} | |
| type={Camera.Constants.Type.back} | |
| > | |
| <React.Fragment> | |
| <View style={styles.closeCameraButton}> | |
| <TouchableOpacity | |
| onPress={() => this.props.close({ textDetections: [] })} | |
| > | |
| <Icon reverse raised name="close" /> | |
| </TouchableOpacity> | |
| </View> | |
| <View style={styles.captureImageButton}> | |
| <TouchableOpacity onPress={this.takePicture}> | |
| <Icon | |
| containerStyle={{ backgroundColor: "red" }} | |
| reverse | |
| raised | |
| name="photo-camera" | |
| /> | |
| </TouchableOpacity> | |
| </View> | |
| </React.Fragment> | |
| </Camera> | |
| ); | |
| } | |
| } | |
| const styles = StyleSheet.create({ | |
| container: { | |
| flex: 1 | |
| }, | |
| loadingContainer: { | |
| flex: 1, | |
| alignItems: "center", | |
| justifyContent: "center" | |
| }, | |
| closeCameraButton: { | |
| flex: 1, | |
| alignItems: "flex-end", | |
| justifyContent: "flex-start" | |
| }, | |
| captureImageButton: { | |
| flex: 1, | |
| alignItems: "center", | |
| justifyContent: "flex-end" | |
| } | |
| }); | |
| export default TextDetectingCamera; |
TextDetectingCamera component will handle capturing the image and the text detection (in next section).
src/TextDetectingCamera.js| import React from "react"; | |
| import { StyleSheet, Text, View, TouchableOpacity } from "react-native"; | |
| import { Icon } from "react-native-elements"; | |
| import { Camera } from "expo"; | |
| import Loader from "./Loader"; | |
| class TextDetectingCamera extends React.Component { | |
| state = { loading: false }; | |
| constructor(props) { | |
| super(props); | |
| this.camera = React.createRef(); | |
| } | |
| takePicture = async () => { | |
| const options = { quality: 0.5, base64: true }; | |
| const photo = await this.camera.current.takePictureAsync(options); | |
| this.setState({ loading: true }, async () => { | |
| try { | |
| this.props.close({ textDetections: [] }); | |
| } catch (err) { | |
| console.log("error", err); | |
| alert("An error has occured"); | |
| this.props.close({ textDetections: [] }); | |
| } | |
| }); | |
| }; | |
| render() { | |
| if (this.state.loading) { | |
| return ( | |
| <View style={styles.loadingContainer}> | |
| <Loader /> | |
| </View> | |
| ); | |
| } | |
| return ( | |
| <Camera | |
| ref={this.camera} | |
| style={styles.container} | |
| type={Camera.Constants.Type.back} | |
| > | |
| <React.Fragment> | |
| <View style={styles.closeCameraButton}> | |
| <TouchableOpacity | |
| onPress={() => this.props.close({ textDetections: [] })} | |
| > | |
| <Icon reverse raised name="close" /> | |
| </TouchableOpacity> | |
| </View> | |
| <View style={styles.captureImageButton}> | |
| <TouchableOpacity onPress={this.takePicture}> | |
| <Icon | |
| containerStyle={{ backgroundColor: "red" }} | |
| reverse | |
| raised | |
| name="photo-camera" | |
| /> | |
| </TouchableOpacity> | |
| </View> | |
| </React.Fragment> | |
| </Camera> | |
| ); | |
| } | |
| } | |
| const styles = StyleSheet.create({ | |
| container: { | |
| flex: 1 | |
| }, | |
| loadingContainer: { | |
| flex: 1, | |
| alignItems: "center", | |
| justifyContent: "center" | |
| }, | |
| closeCameraButton: { | |
| flex: 1, | |
| alignItems: "flex-end", | |
| justifyContent: "flex-start" | |
| }, | |
| captureImageButton: { | |
| flex: 1, | |
| alignItems: "center", | |
| justifyContent: "flex-end" | |
| } | |
| }); | |
| export default TextDetectingCamera; |
To wire them all together, replace App.js at the root of the project with the following code
| import React from "react"; | |
| import { StyleSheet, Text, View, TouchableOpacity } from "react-native"; | |
| import { Camera, Permissions } from "expo"; | |
| import { Icon } from "react-native-elements"; | |
| import TextDetectingCamera from "./src/TextDetectingCamera"; | |
| import DetectedTextList from "./src/DetectedTextList"; | |
| import ErrorMessage from "./src/ErrorMessage"; | |
| export default class App extends React.Component { | |
| state = { | |
| hasCameraPermission: false, | |
| cameraOpen: false, | |
| textDetections: [] | |
| }; | |
| async componentDidMount() { | |
| const { status } = await Permissions.askAsync(Permissions.CAMERA); | |
| this.setState({ hasCameraPermission: status === "granted" }); | |
| } | |
| openCamera = () => { | |
| this.setState({ cameraOpen: true }); | |
| }; | |
| closeCamera = ({ textDetections }) => { | |
| this.setState({ cameraOpen: false, textDetections: textDetections }); | |
| }; | |
| render() { | |
| const { hasCameraPermission, cameraOpen } = this.state; | |
| if (!hasCameraPermission) { | |
| return ( | |
| <ErrorMessage message="This app requires camera permissions to run" /> | |
| ); | |
| } | |
| if (hasCameraPermission && cameraOpen) { | |
| return <TextDetectingCamera close={this.closeCamera} />; | |
| } | |
| return ( | |
| <View style={styles.container}> | |
| <DetectedTextList textDetections={this.state.textDetections} /> | |
| <View style={styles.openCameraContainer}> | |
| <TouchableOpacity onPress={this.openCamera}> | |
| <Icon reverse raised name="photo-camera" /> | |
| </TouchableOpacity> | |
| </View> | |
| </View> | |
| ); | |
| } | |
| } | |
| const styles = StyleSheet.create({ | |
| container: { | |
| flex: 1, | |
| backgroundColor: "#fff" | |
| }, | |
| openCameraContainer: { | |
| alignItems: "center", | |
| justifyContent: "flex-end", | |
| backgroundColor: "rgba(255, 52, 40, 0.6)" | |
| } | |
| }); |
Text Detection with AWS Rekognition
We’ll now add the functionality to perform text detection.
Update DetectedTextList
We’ll first update the the component src/DetectedTextList.js
We can now remove the fake array we used earlier, then update the render method to accept the textDetections array as props.
Determine your endpoint configuration for AWS Rekognition
In the next section we’ll be adding functionality to send an image to AWS Rekognition. The code I provide below will be configured for the Australian ap-southeast-2 region so you’ll need to update the endpoints location to the appropriate region. You can find your endpoint here https://docs.aws.amazon.com/general/latest/gr/rande.html
AWS Rekognition API
Create the following file. This will send a request to AWS rekognition with the base64 of the image.
src/api.js| import Amplify, { API } from "aws-amplify"; | |
| import awsExports from "./aws-exports"; | |
| Amplify.configure({ | |
| ...awsExports, | |
| API: { | |
| endpoints: [ | |
| { | |
| name: "rekognition", | |
| endpoint: "https://rekognition.ap-southeast-2.amazonaws.com", | |
| service: "rekognition", | |
| region: "ap-southeast-2" | |
| } | |
| ] | |
| } | |
| }); | |
| async function detectText(bytes) { | |
| const apiName = "rekognition"; | |
| const path = "/detect-text"; | |
| const body = { Image: { Bytes: bytes } }; | |
| const headers = { | |
| "X-Amz-Target": "RekognitionService.DetectText", | |
| "Content-Type": "application/x-amz-json-1.1" | |
| }; | |
| const init = { | |
| body: body, | |
| headers: headers | |
| }; | |
| return await API.post(apiName, path, init); | |
| } | |
| export { detectText }; |
In the previous section, I mentioned the endpoints need to be updated in the above code if you are not using the ap-southeast-2 region on AWS.
Send photo to AWS Rekognition
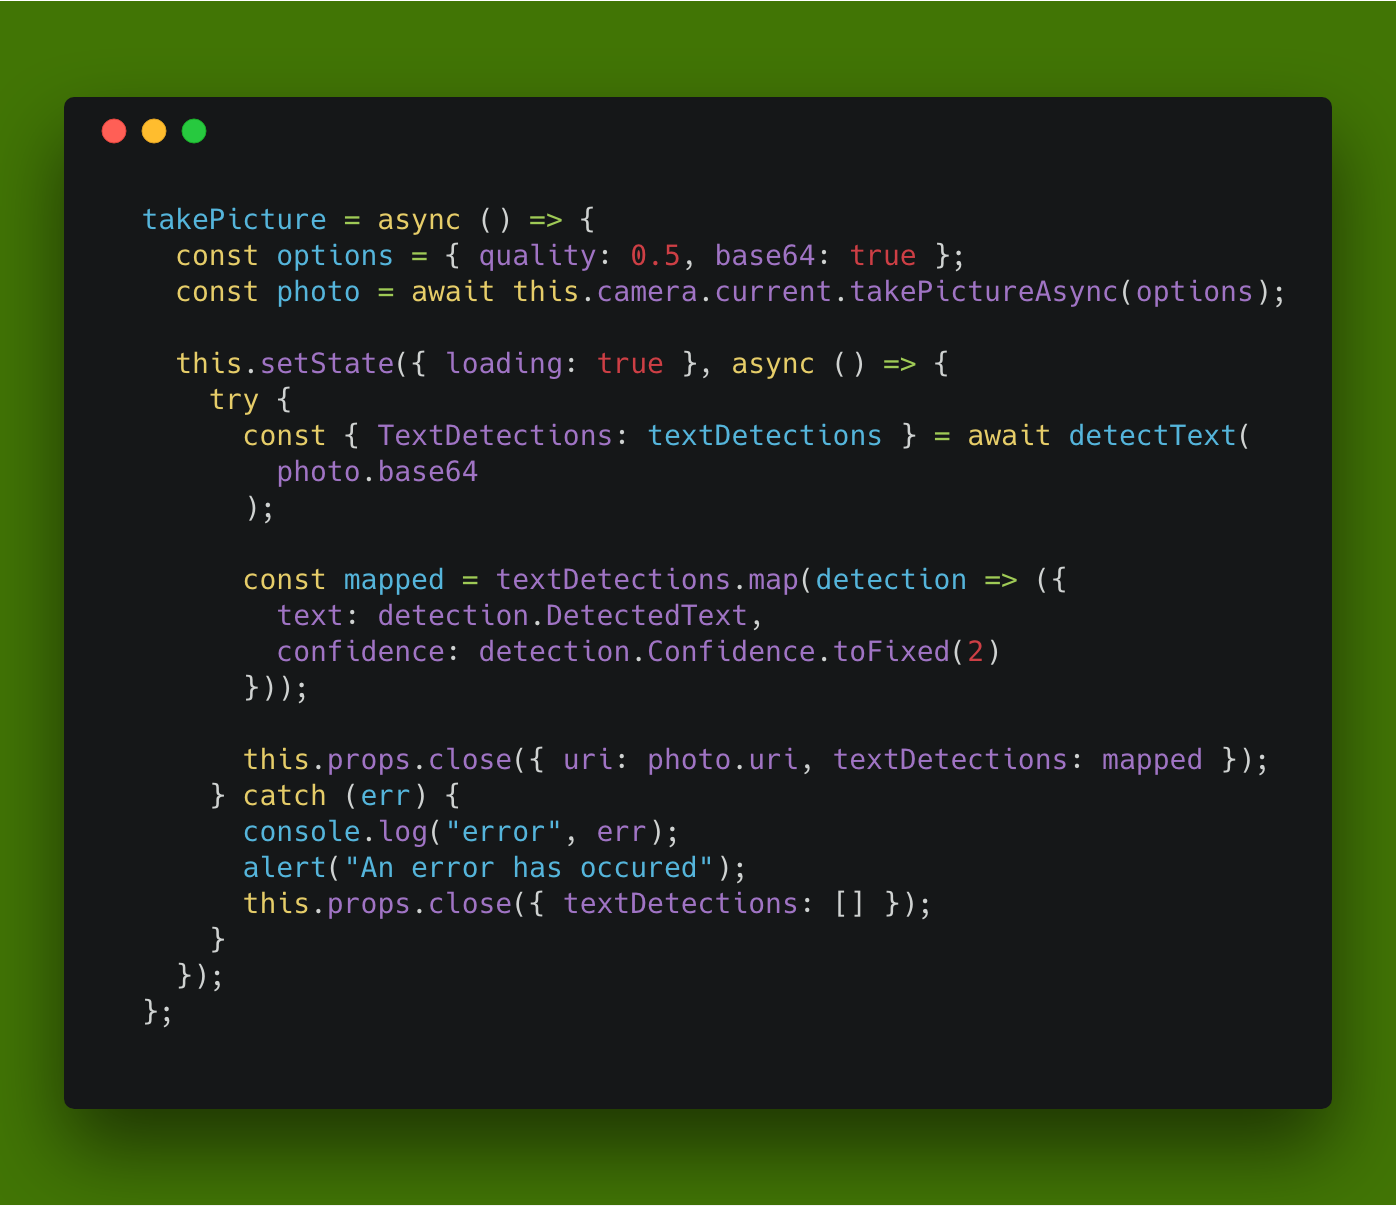
Finally we’ll update the component TextDetectingCamera to use the api when taking a picture.
Add the following import to the component:
import { detectText } from "./api";then replace the takePicture function with the following code:
To run this project you’ll need a device as a camera is required. Run the following command:
yarn run startThis will allow you to run the app through the app Expo.
This app has not been tested against android.